
The Windows 11 Prefetch folder gets pretty big over time, and will also have some outdated files stored in it. So every now and again it’s a good idea to clear out all the files that are within this folder. This is also the case with the Windows 10 prefetch files.
So in this guide, we will be taking a look at how you can manually delete the prefetch files on your Windows 11 PC or laptop. This can be done without using a third party cleaning program and is also a great way to free up some disk space, if you are getting a little low.
TIP: When deleting the files in the Windows 11 Prefetch folder you will need to be signed in as an administrator. Otherwise, you will receive an error message saying “You don’t currently have permission to access this folder. Click continue to permanently get access to this folder”. This will stop you from being able to access the folder if you are not signed in as an admin.
Table Of Contents
Is It Safe To Delete Prefetch Files?
Yes, it is safe to delete Windows 11 prefetch files and you will not cause any harm to your operating system. Clearing out the old prefetch is a good idea as removing the files within the Prefetch folder can help speed up Windows 11.
But as always, when making any changes to Windows 11 we always recommended you backup any important files to an external drive. But don’t worry about the prefetch files as they will get recreated if you delete them.
What Is Windows 11 Prefetch Folder?
The folder is used to store prefetch files which your operating system can use to load up programs and apps faster.
So if you have programs that load when you first sign into Windows 11, then the prefetch files will help make them load faster. Or if you launch a program it helps load the software faster.
Related: How to delete temp files in Windows 11
How To Manually Delete Prefetch Folder In Windows 11
Below are the steps on how to delete prefetch files in Windows 11.
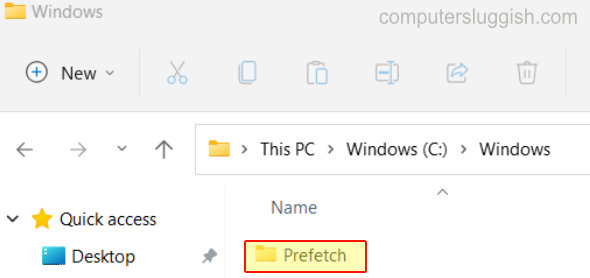
1. Open File Explorer
2. Now open your C: Drive > Open the Windows folder
3. Find the Prefetch Folder and open it
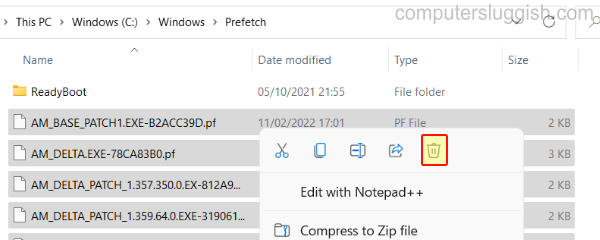
4. If you get a message saying “You don’t currently have permission to access this folder.” then press Continue

5. Now select all the files or the ones which you would like to remove > Once selected right-click and press Delete
So that’s how you can manually delete the prefetch files on your Windows 11 PC or laptop. We hope this guide helped you out and you enjoyed it.
If it was more disk space you were after then you could also manually delete the Windows 11 temp folder files, which will free up even more space! If you did like this guide don’t forget to check out our other Windows 11 guides.