

Installing or upgrading Windows is usually a straightforward process, but sometimes users encounter errors that can be frustrating.
The DRIVER_PNP_WATCHDOG error can occur during the Windows installation process, this can happen when upgrading from within Windows or installing a fresh copy of Windows onto a hard drive.
DRIVER_PNP_WATCHDOG error is often associated with hardware issues or driver conflicts.
So in this article, I will show you the potential causes of the DRIVER_PNP_WATCHDOG error and provide solutions to fix it.
Important: Remember to back up your data before making any significant changes to your system to avoid potential data loss.
Common Causes of DRIVER_PNP_WATCHDOG Error:
The DRIVER_PNP_WATCHDOG error typically occurs when Windows encounters a problem with Plug and Play (PNP) devices during the installation process.
This can be caused by incompatible or outdated drivers, hardware conflicts, or other issues related to device initialization.
See the methods below on how you can troubleshoot and fix the issue, so you can get back to installing Windows 10 or Windows 11.
How To Fix DRIVER_PNP_WATCHDOG Error:
Below are the different methods to help fix the annoying Watchdog error when installing Windows.
Outdated or Incompatible Drivers:
Before starting the installation, ensure that all device drivers are up-to-date.
Visit the manufacturer’s website for each component and download the latest drivers compatible with your Windows version.
If you are updating from within Windows you can do this easily by doing the following:
Boot your system in Safe Mode (if possible).
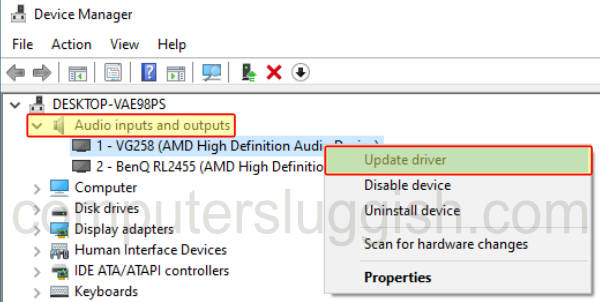
Go to Device Manager (Windows Key + X, then select Device Manager).
Right-click on each device and choose “Update driver.” Select the option to search automatically for updated driver software.
Hardware Compatibility Issues:
Check the compatibility of your hardware with the Windows version you are trying to install.
Make sure that all components meet the system requirements specified by Microsoft for Windows 10 or Windows 11.
BIOS/UEFI Settings:
Access the BIOS/UEFI settings of your computer and ensure they are configured correctly.
Look for settings related to Plug and Play, USB configuration, and SATA operation mode. If possible, update your motherboard’s BIOS/UEFI to the latest version.
You can access your BIOS settings by doing the following:
Restart your computer and enter the BIOS/UEFI settings (usually by pressing Del, F2, or another designated key during startup).
Ensure that the settings related to Plug and Play, USB, and SATA are configured correctly, and update the BIOS/UEFI to the latest version if available.
Faulty Hardware:
Perform a hardware diagnostic test to identify any faulty components.
This may involve testing RAM modules, hard drives, and other critical hardware components. Replace any malfunctioning parts.
So go ahead and use built-in diagnostic tools or third-party software to test your hardware components. Then identify and replace any faulty hardware components.
Final Thoughts:
The DRIVER_PNP_WATCHDOG error during Windows installation can be annoying to resolve, but following the steps above, should help fix the issue so you can get back to installing or upgrading your operating system.
If the issue persists, consider seeking assistance from Microsoft support or online forums where the community members may provide additional fixes.