

Disable Paging File On Windows 10 PC Or Laptop
In this post, we will be showing you how to disable the paging file in Windows 10 on your PC or laptop.
If you no longer want to have a paging file then it can easily be disabled. But it could cause system problems if you don’t have a lot of memory in your computer, so it would be better to change the size of the paging file. It’s fairly straightforward to disable and we have listed the steps below.
Turn Off Paging File in Windows 10:
1. Open the start menu and search “Adjust the appearance and performance of Windows” and open it

2. Click the “Advanced” tab > In the “Virtual memory” box click the “Change” button

3. If you have “Automatically manage paging file size for all drives” selected then untick the box
4. Now select the hard drive that says “System managed” > Now select “No paging file” and click the “Set” button

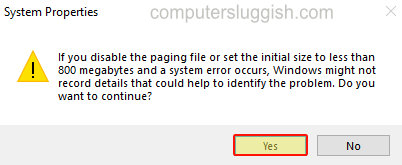
5. You will now get a window pop up saying “If you disable the paging file or set the initial size to less than 800 megabytes and a system error occurs, Windows might not record details that could help to identify the problem. Do you want to continue?” > You need to click “Yes“
6. You have now turned off the paging file in Windows 10
There you have it that’s how you can turn off the paging file in Windows 10 so now your computer will no longer have any virtual memory. Like we previously said, disabling could cause system issues so it would be better to choose a custom size if you are disabling it due to disk space!
Check out more of our Windows 10 posts here.