
Go Back To Windows 10 From Windows 11 On PC Or Laptop
If you have just upgraded your computer to Windows 11 using the installation assistant or perhaps a different way, then you might not love it as much as Windows 10 and want to roll back your computer.
You may also find that Windows 11 is not running correctly or the operating system is just simply not compatible with some of the apps and software you have installed on your computer.
The good news is that as long as you did an upgrade from Windows 10 and not a fresh install of Windows 11, then you can do what Microsoft calls “Go Back”, allowing you to roll back your PC to Windows 10.
Just keep in mind if you made some changes then they will not be kept when you uninstall Windows 11 and Go Back to Windows 10, so below we have listed the steps on how to do this.
****Top Tip****
It’s always a good idea to ensure you have made a backup of any important files on your computer before you roll back the system just in case anything was to go wrong
Downgrade From Windows 11 To Windows 10:
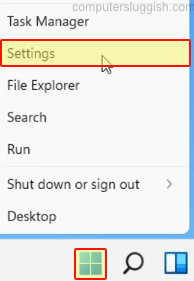
1. Right-click the start menu icon > Click “Settings“
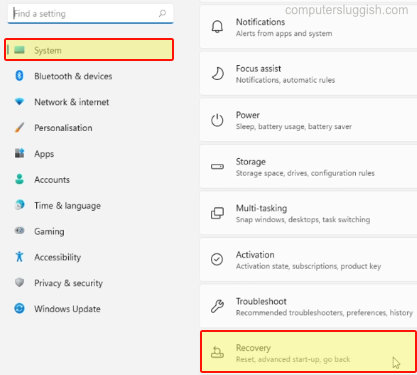
2. Now select “System” on the left-hand side menu and scroll down and click on “Recovery“
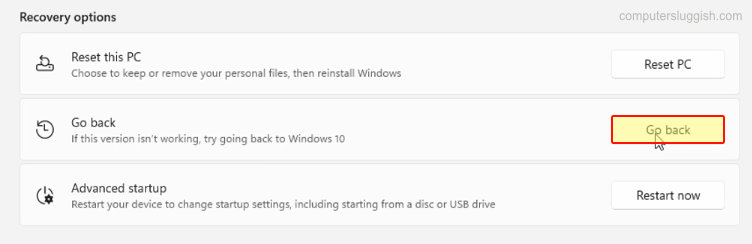
3. Select “Go Back“
4. You will have a window pop up asking for a bit of feedback and once you have chosen your reason click on Next > Click on “No thanks” on the next window
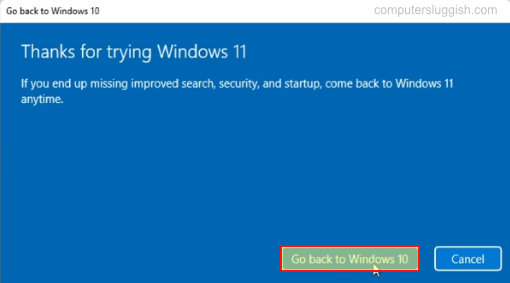
5. The next window will give you some info about the Go back to Windows 10 > Once happy press Next > Press Next again
6. Select “Go back to Windows 10“
That’s it your computer should now be running Windows 10 again. If you do decide that you would like to use Windows 11 again and you don’t have an option to upgrade through Update & Security, then you can always do it using the installation assistant.
Also, if you liked this post then we are sure you will enjoy our other Windows posts here.