

In this guide, we will be taking a look at how you can enable Excel dark mode, including the cells. This will transform how Excel looks on your Windows computer and also help make the program easier to use at night, as it won’t be using the white cells. You might need to change the text colour if you find it hard to read the text on the dark background, within the cells.
Microsoft Excel is a fantastic program that’s a part of Microsoft 365. And although the program does not have an official way of changing the cells to dark mode within the settings, you can do this another way which we show below. But Microsoft 365 does allow us to change all other menus etc. within its programs to use a dark mode.
Will Microsoft Excel dark mode transfer to another PC?
Yes, it will. The dark mode background of the excel workbook cells will transfer over to another computer that uses Excel, and that machine will not need to have the image background for it to work. But with regards to all the menus etc. within Microsoft 365 using the dark mode, that computer will have to have the setting changed within the options.
Can you change the cell’s background back to white?
Yes if you decide that you no longer like the Office 365 Excel dark mode cells, then you can go to Page Layout and then Delete Background

How To Use Dark Mode & Dark Cells In Microsoft Excel
Below are the steps for transforming your Excel program and workbooks into dark mode on your Windows 10 or Windows 11 PC or laptop.
1. First open your Windows start menu and search for and open Paint
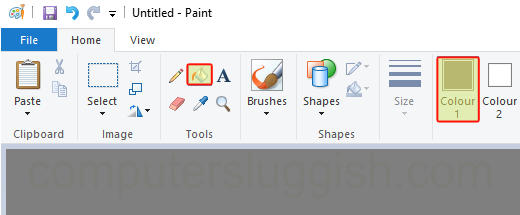
2. Once Paint is open select the Bucket tool > Choose the background colour you would like to use within your Excel cells
3. Now click within the white space/background in Paint using your bucket tool and it should fill with the colour you selected
3. Click File > Save as and save the picture anywhere on your computer
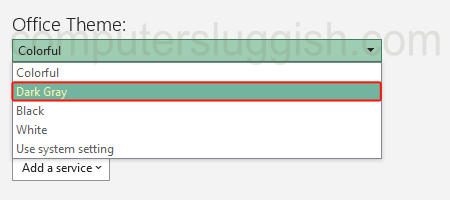
4. Open Excel and select Account
5. Under Office Theme click the dropdown and select Dark Gray
6. Next, create a New Workbook or open the one you would like to change to dark mode
7. Now select Page Layout > Select Background
8. You will now have a window pop up saying “Insert Pictures” so you need to click From a file and select the image you saved from Paint

9. Office 365 Excel will now be in dark mode and also the cells will be dark
We hope the above guide has helped you change Excel to dark mode including its cells.
If you found this Microsoft 365 guide helpful then we are sure you would like our other Windows guides.