

In this guide, we will be taking a look at how to enable NVIDIA G-Sync in Windows. If you have a g sync monitor and of course an NVIDIA graphics card, then you will be able to enable GSYNC. This really does help make a difference within Windows and when playing games, so we highly recommend doing this if you are able to.
NVIDIA G-Sync is an option within the NVIDIA control panel that helps show the best visual with low latency. It also helps reduce screen tearing or completely remove it when playing games.
G-SYNC will stay in sync with your game so there is no need for having V-Sync enabled when you are using it. As you can see having G-Sync really can help benefit if you are a PC gamer!
NVIDIA G-SYNC requirements
If you are missing the NVIDIA G-Sync option in the NVIDIA control panel then you need a monitor that supports this feature and there are system requirements to be able to use G-sync in Windows, which we have listed below.
So if you do not have an option to enable G-sync and it appears to be missing then you probably don’t have the below requirements:
- OS: Windows 10/11
- Graphics: GeForce 10 series or higher
- Driver: R417.71 or higher
- Monitor: G-Sync compatible monitor connected via DisplayPort v1.2
NVIDIA G-Sync is a great way to remove screen tearing when playing games on your PC and basically just make games feel smoother. So when you buy a new monitor ensure it has NVIDIA G-Sync support otherwise the G-Sync option will be missing on the control panel in Windows.
How to enable G-sync on Windows PC
Below are the steps for enabling NVIDIA G-Sync in Windows 10 or Windows 11.
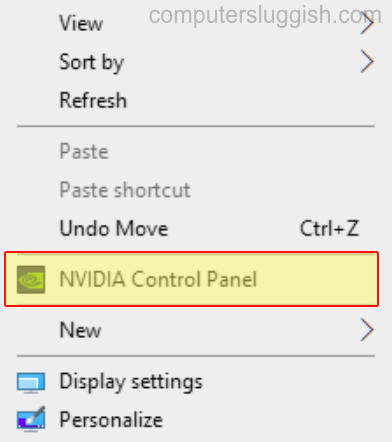
1. Right-click on your desktop and select NVIDIA Control Panel
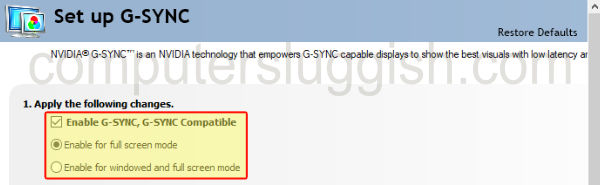
2. Expand the Display option > Select Set up G-SYNC

3. Tick the checkbox that says “Enable G-SYNC, G-SYNC Compatible“
4. Now select one of the following options:
- Enable for full screen mode
- Enable for windowed and full screen mode
5. Choose the monitor your would like to enable G-Sync on
6. Now tick Enable settings for the selected display model

7. G sync will now be turned on for your chosen display
We hope the above guide helped set up G-Sync on your Windows computer and you can now enjoy playing your games screen tear free.
If you enjoyed this guide and found it helpful then we are sure you would like our other gaming guides.
Check out our YouTube video here on “Enable Nvidia G-Sync In Windows” if you are getting stuck.