

Key Notes:
Resolving black and white screen issues when trying to play MW3 on your PC can be resolved by updating your graphics card, clearing your GPU cache files, and ensuring Windows is up to date.
In this guide, I will show you solutions for resolving black screen issues in Call of Duty: Modern Warfare 3 on your Windows 10 or 11 PC.
If you find yourself facing a frustrating black screen, white screen, or blank screen while attempting to play the game, there are steps you can take to address these issues.
Call of Duty: Modern Warfare 3 offers an intense multiplayer experience where players battle for their team’s victory, much like previous COD titles.
However, encountering a black screen during game loading or launch can be maddening. In this guide, we’ve compiled a list of methods to assist you in resolving these issues.
What Causes the MW3 Black Screen on PC?
Several factors can trigger the black screen or display problems in Call of Duty: Modern Warfare 3 when playing on your Windows 10 or 11 PC.
Potential things include graphics card driver issues or compatibility problems related to screen resolution settings.
Additionally, making certain graphics adjustments within MW3 may lead to startup problems and graphics-related glitches.
Methods to Fix Modern Warfare 3 Black Screen on PC
Below, we have listed several methods you can use to fix black screen issues and display problems in MW3 on a Windows 10 or 11 PC. You may need to try each method until you find the one that resolves the issue for you.
Method 1: Update or Reinstall Graphics Drivers
Check for updated graphics card drivers. If none are available, consider reinstalling your current driver.
This can help resolve issues associated with outdated or problematic drivers. You can also install previous versions of AMD or NVIDIA drivers if necessary.
Below are some guides I have done that will help with updating your graphics driver:
Method 2: Update DirectX
Ensure you have the latest version of DirectX installed on your Windows PC.
You can do this through Windows Updates or by downloading the setup file from the Microsoft website.

Method 3: Clear cache files using EGU
Download Easy Gamer Utility from our website here
Once downloaded install the program then open it
Now Click on the Clean Tab then click the Clean button next to your graphics card Cache files
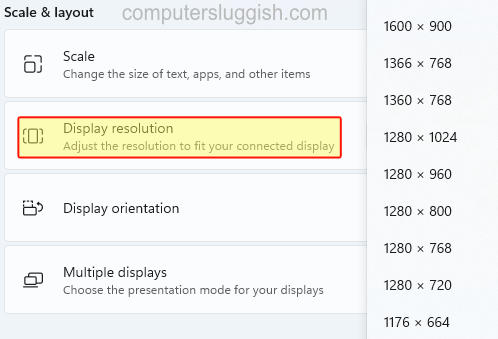
Method 4: Adjust Screen Resolution
Alter your Windows screen resolution as well as the in-game resolution settings.
This step may help in resolving display problems. If you have set a really high resolution in Windows or within the game lower it.
Windows 10:
Right-click on your desktop, open Display Settings
Click on Advanced Display Settings
Under Refresh Rate, select the appropriate rate
Windows 11:
Right-click on your desktop to access Display Settings
Select Advanced Display and adjust the rate from the drop-down menu
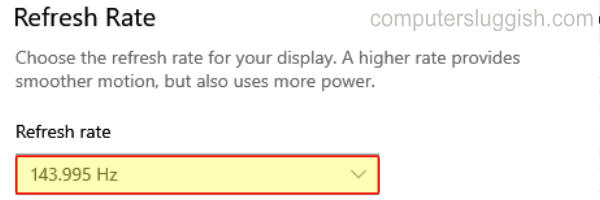
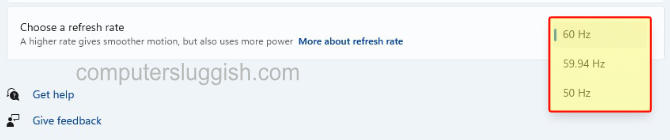
Method 5: Change Refresh Rate
Similar to adjusting the resolution, modifying the refresh rate, both in Windows and in-game, may help address issues.
Windows 10:
Right-click on your desktop, open Display Settings
Click on Advanced Display Settings
Under Refresh Rate, select the appropriate rate
Windows 11:
Right-click on your desktop to access Display Settings
Select Advanced Display and adjust the rate from the drop-down menu
Method 6: Disable G-Sync / FreeSync
If you’re using G-Sync or FreeSync, consider disabling these features, as they may be causing conflicts.
Instructions for disabling these features are provided for both NVIDIA and AMD GPUs.
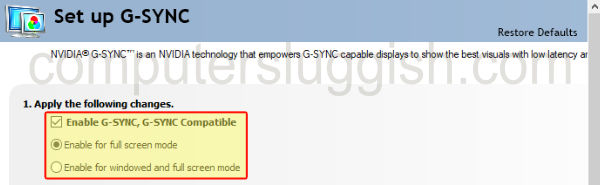
G-Sync:
Right-click on your desktop and open NVIDIA Control Panel.
Expand Display and click on Set up G-SYNC.
Untick “Enable G-SYNC, G-SYNC Compatible.”
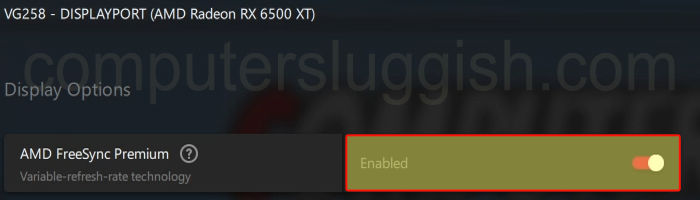
FreeSync:
Open your AMD Software: Adrenaline Edition.
Click on the Settings cog, go to the Display tab, and toggle AMD FreeSync to Disabled.
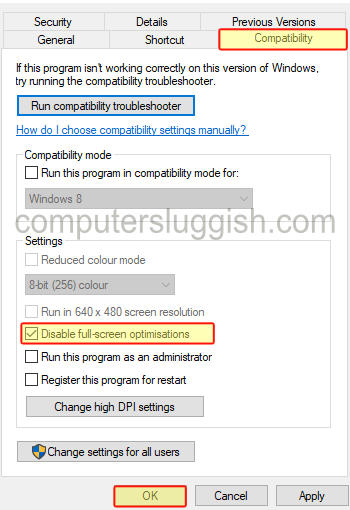
Method 7: Enable Full-Screen Optimization
Enable full-screen optimization for the game’s .exe file. This can be done by accessing the game’s properties and adjusting compatibility settings.
Method 8: Reset In-Game Graphics Settings
If you’ve made changes to in-game graphic settings, incorrect configurations may be the root cause of the black screen issue.
Reset the settings file to its default state, you can do this by going to your documents folder and renaming the Call of Duty folder (Add backup to the folder name).
Method 9: Check Display Cable Connection
Ensure that the display cable connecting your computer and monitor is securely plugged in.
Reconnect it or try using a different port if available.
Method 10: Reinstall the Game
If none of the above methods provide a solution, consider reinstalling the game. This may resolve any installation-related problems, install the game to an SSD and if possible to a different drive within your computer.
Final Thoughts
We hope that one of these methods helps you resolve the MW3 black, blank, or white screen issue on your Windows 10 or 11 PC, allowing you to enjoy the game without interruptions.
If you found this guide helpful, we have more gaming guides that you might find useful.