
In this guide, we will be taking a look at fixing Microsoft gaming services in Windows. Have you tried to play a game from the Microsoft Store or perhaps you have installed a game using the Xbox app in Windows 10 or Windows 11, and are not able to launch any games? You may keep getting a message saying “gaming services is missing“, or you are just getting an error code. Don’t worry as there are a few things that you can do that should fix Windows gaming services on your PC or laptop.
There are many games in the Microsoft Store and the Xbox app, including games from your Xbox subscriptions such as Game Pass. But a lot of these require the Gaming Services to be running in Windows to be able to play them. And if there is an issue then you will not be able to play the game until it’s resolved.
So we have put together a few different methods below that you can try, to hopefully fix the gaming service so you can get back to playing the game again.
Why is my gaming services app not working?
There can be many reasons why your gaming services app is not working in Windows 10 or Windows 11. It could be due to it being missing as it’s not installed in Windows, one of the gaming services might have run into an error, or something has gone wrong with the gaming services files so it needs reinstalling.
How to fix Microsoft Gaming Services in Windows
Below are the different methods for fixing Microsoft Gaming Services not working on Windows. You will need to do each method until one resolves the issue you are having.
Fix 1: Install Gaming Services
If you have not got the Gaming Services installed in Windows then you are going to have problems trying to play some of the games in the Microsoft Store and Xbox app. but luckily we can manually install it:
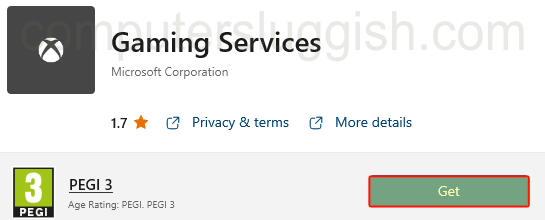
- To install the Gaming Services in Windows first you need to go to the following link: Gaming Services download link
- Once you have opened the link above click “Get in Store app“
- The Microsoft Store should now be open and you will be able to click Get > This will begin to install the Gaming Services to your computer
Fix 2: Update Microsoft Store apps
If you have not updated all the apps within the Microsoft Store in a while then there could be a new update available for Gaming Services:
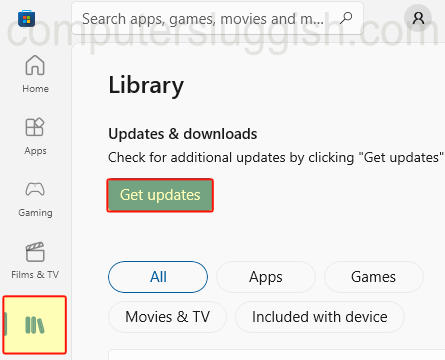
- Open the Start menu and search Microsoft Store
- Select the Library icon
- Now click the Get updates button > This will then update all the apps within the Store
Fix 3: Update Windows
It’s important to ensure you have the newest Windows version installed on your computer. This can be for security reasons, but also because there could be an update that fixes the issue that you are facing.
Windows 10:
- Right-click the start menu > Settings
- Go to Update and security > “Check for updates“
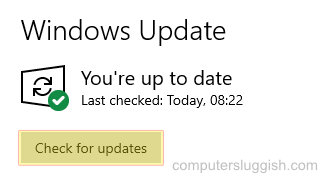
- Open Settings by right-clicking on the start menu icon
- Select Windows Update and then click on the “Check for updates” button

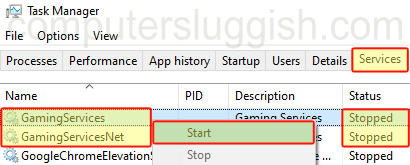
Fix 4: Start Gaming Service
The services might not be running and if this is the case then you are going to get all sorts of error messages:
- Right-click on the start menu icon and select Task Manager
- Now click the Services tab
- Find GamingServices and GamingServicesNet
- If the Status says Stopped then right-click on each service and click Start
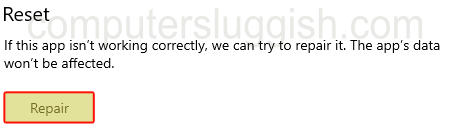
Fix 5: Repair Gaming Service
If there is an issue with something with the Gaming Service configuration itself, then doing a repair could resolve this:
- Right-click the Start menu and select Apps and Features
- Now search for Gaming Services
- Next click Terminate
- Then under Reset, you will see a Repair button which you need to click
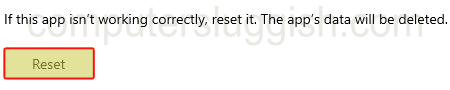
Fix 6: Reset Gaming Service
Same as the above if there is something going on with the Gaming Service then doing a reset could also help:
- Right-click the Start menu and select Apps and Features
- Now search for Gaming Services
- Next click Terminate
- Click on Reset
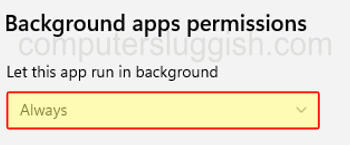
Fix 7: App permission
By default, the app permission for the Gaming Service is set to Power optimised, so try changing it to Always:
- Right-click the Start menu and select Apps and Features
- Now search for Gaming Services
- Click on Advanced Options
- Under “Background apps permissions” select the drop-down and change to Always
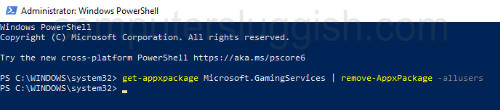
Fix 8: Uninstall Gaming Service
If none of the above methods have helped then uninstalling the Gaming Service from Windows and then installing it again should do the trick:
- Open the Start menu and search Windows PowerShell
- Right-click on Windows PowerShell and select Run as an administrator
- Now copy and paste the following code into PowerShell and press Enter to remove Gaming Services from Windows:
get-appxpackage Microsoft.GamingServices | remove-AppxPackage -allusers- Once removed reinstall the Gaming Services to Windows again (As explained in Fix 1)
We hope the above methods have helped fix the gaming service on your Windows computer and that you are now able to jump back into your games and enjoy them. Especially if you are doing the Xbox pay monthly, as you will want to get your money’s worth!
If you found this guide helpful then we are sure you would like some of our other Windows guides.
Check out the video tutorial here on How to fix Windows gaming services if you are getting stuck.