
Repairing Easy Anti-Cheat In Windows 10
In this guide, we will be taking a look at fixing Easy Anti-Cheat on your Windows PC or laptop, the service gets installed with certain games and is required to be able to play them online to help stop players from cheating in-game making things fairer.
If you have been having problems with Easy anti-cheat kicking you from games when trying to play them online, or you have been having other weird issues with Easy anti-cheat, then running a repair on Easy anti-cheat can help fix all kinds of problems.
How To Repair Easy Anti Cheat Windows 10:
Below I have written the steps to fix Easy anti-cheat in Windows 10.
1. Go to the directory of the game that uses Easy Anti Cheat and find the EasyAntiCheat Folder (I am going to use Fortnite as the example which is located in where you installed Fortnite then: \Epic Games\Fortnite\FortniteGame\Binaries\Win64\EasyAntiCheat)
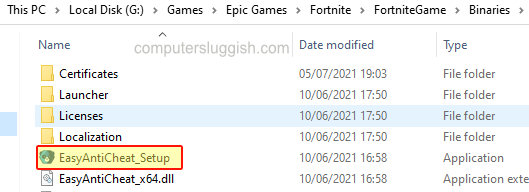
2. Now go ahead and run the EasyAntiCheat_Setup
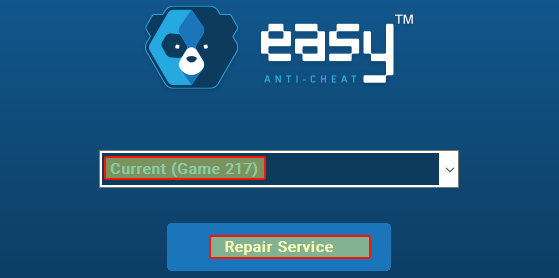
3. Now select “Current” if you wanted to fix Easy anti-cheat for the game that you ran the easyanticheat_setup file from it’s location > Now click “Repair Service“
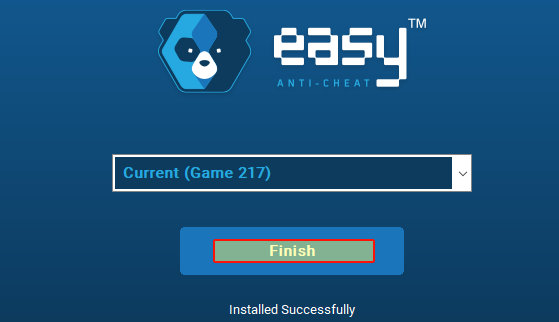
4. It will now repair Easy Anti-Cheat > Once it has finished repairing go ahead and click the “Finish” button.
There you have it that’s how you repair Easy Anti Cheat in Windows 10 and you should no longer get any error messages.
However, if you are still getting errors then you might need to uninstall then install the game again.