

In this guide, we will be taking a look at how to enable the ultimate power plan in Windows 10. Windows has a few different power plans to choose from such as high performance, balanced, and power saver. But if you are finding these are not enough for you, then there is a hidden ultimate power plan within Windows 10 that you can add to your PC or laptop.
The advantage of adding this power plan is that it will allow your system to take advantage of even more power, which can help give your computer a boost in performance allowing everything to run even smoother and faster. Check out the steps below to see how to add and enable the ultimate power plan.
Why add an ultimate performance power plan?
There are many reasons why you would want to add and use the ultimate performance power plan in Windows 10, which we briefly explained above.
For the first instance, it will allow your system to use more power. Which will result in helping make Windows 10 run a lot faster and smoother.
Not only this, but if you also play a lot of games on your computer then you should see a slight increase in the performance of your games. This can help improve the FPS and reduce any stuttering or lagging issues you might have been experiencing in your PC games.
Is it safe to use the ultimate performance power plan?
Yes, it is safe to use the ultimate performance power plan in Windows 10. The only affects you will see is your computer will run a little quicker, as it will be using slightly more power.
Just keep in mind that if you are using a laptop that is not connected to the mains, then it will drain the battery slightly faster.
We would also recommend you back up any important files before you enable the ultimate power plan and also create a system restore point on your Windows 10 computer.
How to add the ultimate power plan in Windows 10:
Below are the steps on how to add the hidden power plan using PowerShell.
1. Open the Windows start menu and search “PowerShell” > Open and run this as an admin
2. Now copy and paste the following code into PowerShell and press enter:
powercfg -duplicatescheme e9a42b02-d5df-448d-aa00-03f14749eb61
How to enable ultimate power plan in Windows 10
Now you have added the plan you can easily enable it on your PC or laptop.
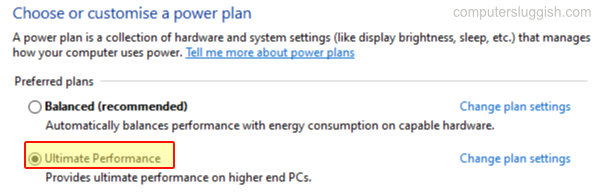
1. Now open the start menu and search and open Control Panel
2. Change “View by” to “Small icons“
3. Click on Power Options
4. Select Ultimate Performance
Add Ultimate Power Plan Using EGU
Or if you would prefer you can use our program Easy Gamer Utility to add the ultimate power plan but it will require you to purchase the PRO plan.
Download Easy Gamer Utility from here
Now click on the Tweaks tab once activated then tick Add Ultimate power plan and click Apply then do the above in the Control Panel to start using the plan

There you have it that is how you enable and add the ultimate power plan in Windows 10. Your system will now be running at full power.
Just keep in mind that this option will consume more power than the other power plan options within Windows 10.
If this helped then check out more of our Windows 10 posts here.
Check out our YouTube video here on Windows 10 BEST Gaming Power Plan if you are getting stuck.