

Keep Laptop Permanently In Battery Saver In Windows 10
If you like Windows 10 battery saver and found it really helps make your battery life last longer, then why wait until your battery hits a certain percentage before it enters battery saver mode.
You can just make Windows 10 always be in battery saver so your battery life will last a lot longer at all times, which is exactly what we will be showing you how to do below.
Always Keep Windows 10 In Battery Saver:
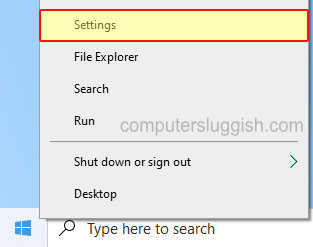
1. Right-click the Start menu icon and click “Settings“
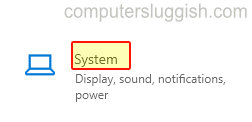
2. Now click on “System“
3. In the left menu select “Battery“
4. Under “Turn battery saver on automatically at” click the dropdown and select “Always“

5. Now under “Battery saver” if Off toggle to On
That’s it you have now told Windows 10 to always stay in battery saver mode so your battery life will last a lot longer between charges. Just keep in mind though that battery saver does limit Windows 10 background activity and also notifications!
If you enjoyed this Windows 10 post on battery saver then we are sure you will like all our other Windows 10 posts here.