

Fix Windows 10 High Memory Usage On PC Or Laptop
In this post, we will be taking a look at why Windows 10 is using 100% high memory usage, which is causing your PC or Laptop to become really slow and sluggish.
There can be a few different reasons as to why Windows 10 is using high memory usage. It could be an issue with a program, a Windows system file has become corrupt, or your memory might have become faulty, etc.
Regardless of what is causing the high memory usage below, we have listed a few things that you can do which will hopefully fix the problem.
Fixing High Memory Usage In Windows 10:
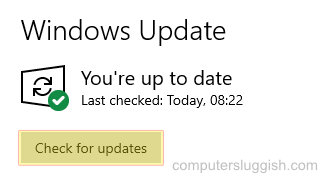
1. Ensure all hardware drivers and Windows 10 is up to date:
- Right-click start menu > Click “Settings” > Now open “Update & Security“
- Click the “Check for updates” button > If any new updates are found they will begin to download and install
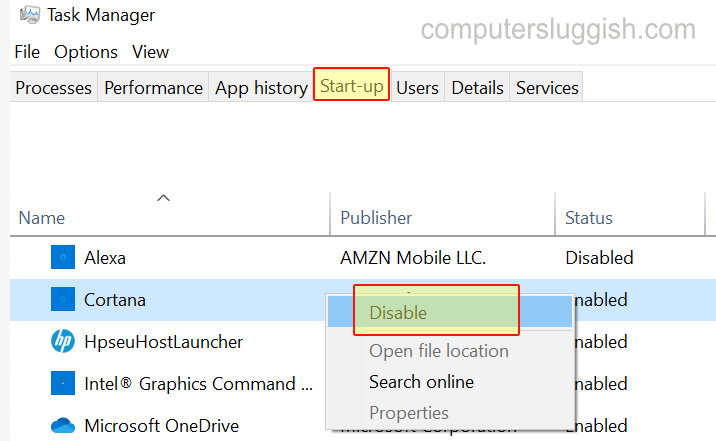
2. Disable All Programs From Startup – Disable all of your startup programs to ensure one of them is not causing the high memory usage problem:
- Right-click the taskbar > Open “Task Manager“
- Now select the “Startup” tab > Disable all of your startup programs by right-clicking on a program and pressing “Disable” (If you disable your security you might not be protected from threats so be careful)
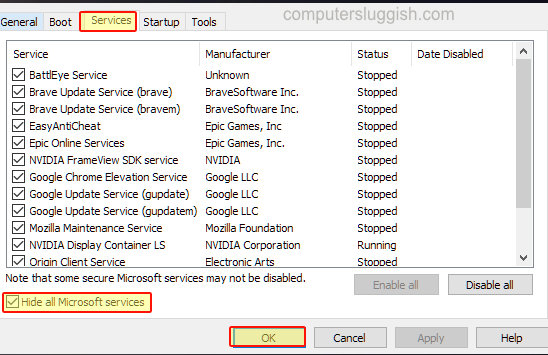
3. Disable all services in Windows 10 – Disable non Microsoft services as one of your services could be causing the high memory usage:
- Open the start menu and search “Msconfig” > Open System Configuration
- Now click the “Services” tab > Tick “Hide all Microsoft services” > Now deselect any services you do not need or click on “Disable all services” then click the “OK” button (Make sure you do not disable any services that you need or are currently using. If you disable your security service you might not be protected from viruses)
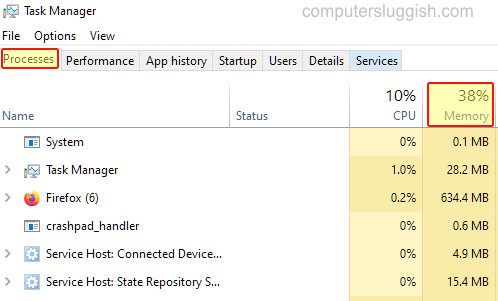
4. Look in Task Manager to see what is causing the high memory usage:
- Right-click on Taskbar > Task Manager
- Select Processes tab > Look in the “Memory” column to see if anything is using alot of memory
5. Run a security scan – High memory usage could be a sign of a virus or malware on your computer so run a scan to make sure this is not the case. We will show you how to do this in Microsoft Defender:
- Open start menu and search “Windows Security” and open it
- Click “Virus & threat protection” > Now select “Scan options“
- Run a “Full scan” and once finished run a “Microsoft Defender Offline scan“

6. Memory Diagnostics – Run a memory diagnostic to ensure your memory is not faulty:
- Open the start menu and search “Windows Memory Diagnostic“
- You will now get a window saying “Check your computer for memory problems” Click “Restart now and check for problems” (Make sure you have everything saved before doing this)
- Windows Memory Diagnostics will now check your memory for problems

7. Reset Windows 10 – If you are still having issues with memory usage being really high then doing a reset will restore Windows 10 back to default settings and will hopefully resolve the issue. But ensure you have important data backed up first:
- Right-click start menu icon > Click “Settings” > Now click “Update & Security“
- In left menu click “Recovery” > Under Reset this PC click “Get started” and follow the steps

There you have it that’s how you can fix and resolve high memory usage problems in Windows 10. Hopefully, one of the methods above helped fix the issue for you.
We have lots more awesome Windows 10 posts here.