

Fix Wi-Fi Network Problems On PC or Laptop
If you are having issues with your Wi-Fi such as; Not being able to connect to it, not allowing you to connect to the internet, or it won’t even connect to your local area network, then this could be caused by a couple of issues.
By following the below steps we will hopefully be able to fix the issues you are having with your Wi-Fi on your Windows 10 PC or laptop.
Steps To FIX Wi-Fi Not Working:
1. Check that the router or Wi-Fi point you are trying to connect to is turned on and has no warning lights – If you have another device try connecting to the WIFI and see if it works
2. Restart your Laptop or PC – This can work wonders when having issues with Wi-Fi network adapters
3. Ensure you have entered the correct Wi-Fi password – If you have recently changed the Wi-Fi password then you will need to re-enter the new password:
4. Forget the Wi-Fi network and try rejoining:
- Right-click on the network icon in the system tray > Click Open Network & Internet settings
- Select the Wi-Fi tab on the left >Click Manage known networks > Click on your Wi-Fi network then click Forget
- Now rejoin the network

5. Disable your Wi-Fi network adapter and enable it again – Sometimes by doing this you refresh your adapter and it can do the trick:
- Right-click the network icon in the system tray > Click Open Network & Internet settings
- Click Change adapter options > Right-click on your Wi-Fi network adapter and click Disable
- Right-click again on it and click Enable

6. Make sure Flight mode is disabled on your laptop or PC – If it is in airplane mode then this can stop your Wi-Fi from working as it disables all wireless communications on your device:
- Right-click on the Windows start menu icon > Settings
- Click on Network & Internet
- Select Flight mode tab on left-hand side > Toggle Flight mode to OFF

7. Run a diagnostic on your Wi-Fi network adapter – This can sometimes resolve connections issues:
- Right-click the network icon in the system tray > Click Open Network & Internet settings
- Click Change adapter options
- Right-click on your Wi-Fi network adapter and click Diagnose
- Windows will run a Network Diagnostics Troubleshooter and if any issues try to resolve them

8. Flush your DNS cache – Clearing your Domain Name System cache can often help with network issues:
- Open the Windows start menu and search “cmd” > Open Command Prompt as an administrator
- Type ipconfig /flushdns and press enter

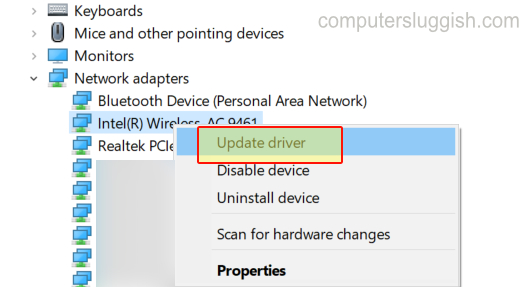
9. Check you have the latest drivers installed for your network adapter – If you don’t then install them:
- You can head over to the manufacturer’s site for your network adapter for the latest drivers
- You can also update drivers using Device Manager: Right-click on Windows start menu icon > Device Manager > Expand Network Adapters > Right-click on your adapter > Click Update driver
10. Remove the current network adapters for your Wi-Fi then install them again – This is just in case they have become corrupt, but just make sure you have the network drivers already downloaded and ready to install when doing this:
- Right-click on Windows start menu icon > Device Manager
- Expand Network Adapters > Right-click on your adapter > Click Uninstall device
- Restart your PC
- Reinstall the correct adapter and driver on your PC

11. Restart your router – Just make sure no one else is currently using the internet as it will disconnect them from it
If you are still unable to connect to your Wi-Fi then your Wi-Fi network adapter might be faulty and need replacing. You could also try a Wi-Fi USB and connect to your router.
Alternatively, it could be an issue with your Windows 10 and one of the files have become corrupt and Windows needs resetting.