
Setting Up GeForce Now In Windows 11
Not got a powerful PC or laptop but enjoy playing games in Windows 11, and would like to play games that require better hardware components? If this is you then the good news is that Nvidia has what you need and it is called GeForce Now!
GeForce Now has over a thousand games that are ready for you to play. You might be wondering how can you play a game on a slow computer, well it’s called Nvidia cloud gaming and it allows you to stream games to your computer using GeForce Now, and you can even stream games that you already own!
So you must now be wondering how can you set up Nvidia Geforce Now on your Windows 11 PC or laptop. Well that’s exactly what we will be showing you how to do in this guide, and don’t worry it’s not too difficult to do.
How Much Is GeForce Now?
It’s free! Well at the time of writing this it is but if you do want more, then just like anything else you can pay for more features.
Currently, at the time of writing this guide there are two Geforce Now Memberships which are:
- Free – Standard access, 1-hour session length
- Priority – Priority access to gaming servers, 6 hour session length, RTX ON
- RTX 3080 – RTX 3080 Rig with RTX ON, Exclusive access to RTX 3080 Servers and 8 hour Session Length
You can view all the up-to-date information and prices on the GeForce Website here as the above details might not be correct.
Does GeForce Now Really Work?
Yes, GeForce Now really does work and the time we have spent within it has been great with very few issues. But depending on how good of an internet connection you have will have an effect on just how great it does work, as you are streaming the game to your computer using the internet. So maybe kick everyone off the internet in your house when do decide to play, just in case!
Are All Games in GeForce Now Free To Play?
The short answer is no, unfortunately not all the games within GeForce Now are free and you will need to link the other accounts that you have purchased the games on to be able to play them. For example link your Steam, Epic Games, and Ubisoft Connect accounts.
But there are also some great free-to-play games like Fortnite as an example. If you do want to view a GeForce Now games list of all the games that are currently supported then check them out here.
Installing GeForce Now In Windows 11
1. First you need to go here to download GeForce Now and select “Download” under Windows PC
2. Once the NVIDIA GeForce Now has finished downloading you now need to run the setup file

3. After GeForce Now has finished installing it will open automatically
4. Now click “LOG IN” in the top right corner and sign in to your NVIDIA account (If you do not have one then you will need to create one)

Setting Up GeForce Now In Windows 11
1. After you have finished installing GeForce Now and launched the program we can now take a look at setting it up and first you need to connect your account and to do this first click the 3 lines in the top left corner > Now click onto “Settings“

2. Next find “Connections” > You now need to sign in to the accounts which you would like to play games from (So if you have a game you have purchased in Steam and you want to play it in GeForce Now then you need to link your Steam account and you will then be able to stream that game within GeForce Now)

3. You then need to set the “Server Location” (Ideally, you want to choose the server location which is closest to your location as it will provide the best network performance making the games run a lot smoother when you are streaming them)

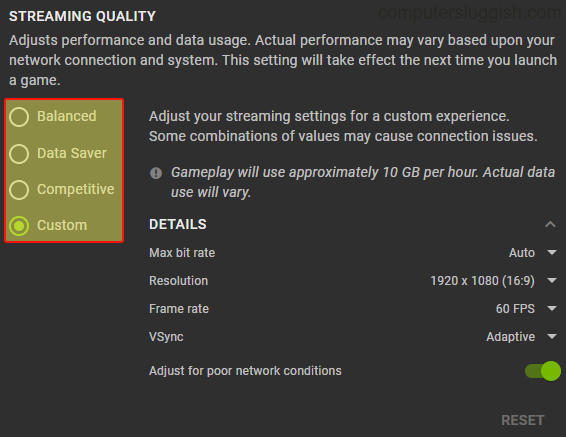
4. Now you can change the “Streaming Quality” (Depending on how good your internet connection is will depend on which setting you can choose.
There are 4 different options Balanced, Data Saver, Competitive or Custom) > Choose the setting which suits your internet connection best (We prefer to use Custom so we can play around with the setting)
5. Now you have set everything up within the NVIDIA GeForce Now settings you can return to the home screen with all the games and you can now select the game which you would like to stream (remember you can only stream either Free To Play games or games that you own) > Once you have chosen the game click the platform you want to use to access the game then click “PLAY“

So that’s how you install and set up NVIDIA Geforce now in Windows 11. You can now start streaming your favourite games within the program.
NVIDIA are always adding new games to GeForce Now so if you are unable to stream your favourite game then we are sure it will get added at some point in the future, if it’s a popular game!
If you found this guide helpful then we are sure you will like our other Windows 11 guides here.