If you want to rename the administrator name in Windows, then this is easy enough to do. As you might already know Windows 10/11 comes with a default administrator account already set up called the administrator. And although it is hidden it can still be used to sign into Windows 10 or Windows 11.
That is of course if it’s active which by default is disabled, so if you do activate the admin user then you can always change the admin name in Windows to something else of your own choosing. So below I have listed a step-by-step on how to do this.
Table Of Contents
What does administrator account mean?
An administrator has full privileges in Windows so it can make system changes, modify files, install/uninstall software, create new users, remove user accounts, etc.
This is not something you want people to be able to access on your computer and as I said above, Windows sets up an administrator account by default. But luckily we can Rename it to help make our systems even more secure.
How to rename admin account
Below are the steps to rename the hidden admin account in both Windows 10 and Windows 11 using Command Prompt, and this will work even if the administrator is not active.
You can also do this using Control Panel, but only if the user account is active.
1. First, you need to open the start menu and search Command Prompt and open it as an administrator
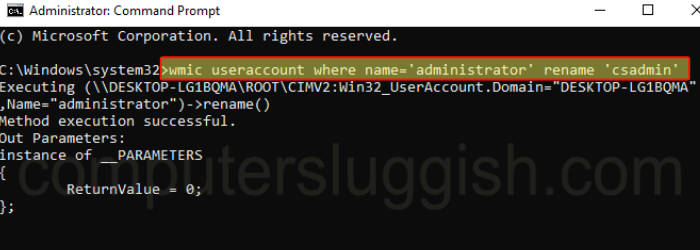
2. Now type the below cmd command to change the admin name (replace the ‘new account name’ with the name you want to rename the administrator to
wmic useraccount where name='administrator' rename 'new account name'3. Now press Enter once you have typed in the above command

Thats how you can rename the admin account in Windows 10 and Windows 11 regardless if the account is active or not.
I hope you liked the above guide, and if you did then we have many more Windows guides just like it.
Check out our YouTube video on Windows Hidden Administrator Account if you get stuck.


