

In this guide, we will be taking a look at how you can disable MPO also known as Multiplane overlay in Windows 10 and Windows 11.
When it comes to disabling the Multiplane overlay in Windows, it needs to be done from within the Windows registry editor so you might want to create a backup of the registry before making the changes.
Although it is safe to disable MPO in Windows 10/11 if you were to accidentally edit the wrong thing within the Registry Editor, you could cause damage to Windows. But as long as you follow our easy step-by-step guide below then you will be fine.
Related: Fix NVIDIA/AMD flicker & stutter in Windows
Why disable multiplane overlay in Windows
If you have been having problems with your display while using Windows for example stuttering or flickering, then disabling the MPO support can sometimes help resolve these problems.
Then you will need to wait until a new driver or Windows update is released for your graphics card that resolves the problem.
MPO Windows (What is it?)
Windows Multiplane Overlay (MPO) is a graphics technology used in Windows to enhance the visual experience and user interface.
MPO allows for the seamless overlay of graphical elements and user interface components in a multi-layered fashion, which can improve the overall usability of Windows applications.
By using MPO, developers can create more dynamic and visually appealing user interfaces, with the ability to overlay and blend elements such as animations, widgets, and notifications.
So as you can see MPO is useful for creating modern Windows applications, allowing them to be more engaging and user-friendly.
How to disable MPO in Windows
Below is how to disable Multiplane overlay support in Windows, if you decide you want to enable the MPO support again you can just delete the value that we create below.
The steps shown below are how to disable mpo in the Windows registry.
1. Before we can do anything first, you need to open the start menu and search for Registry Editor and then open it
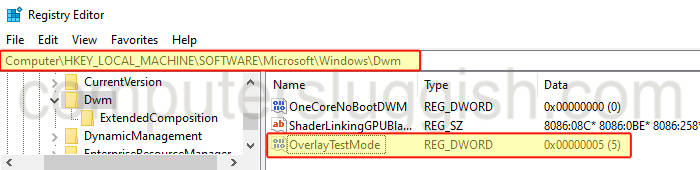
2. Now go to the below location or copy and paste the path below into the address bar
Computer\HKEY_LOCAL_MACHINE\SOFTWARE\Microsoft\Windows\Dwm3. Right-click on an empty space then select New > DWORD (32-bit) Value
4. Now name the entry OverlayTestMode
5. Right-click on the new entry and select Modify and change the Value data to 5
Final Thoughts
That’s it I hope the above guide has helped you disable mpo. As you can see the above steps are easy enough to follow and you will now have disabled multiplane overlay in Windows 10 and Windows, hopefully this has helped resolve any issues that it was causing.
If you liked this guide and found it helpful then I am sure you would like our other Windows guides.