
In this guide, we will be taking a look at how to reduce your image file size in Windows 11. If you want to make your picture file size smaller then there is a really easy way to reduce the file size of images quickly within Windows, which is what we will be showing you in this guide.
If you have loads of images on your Windows 11 computer then you have probably noticed that they can take up a lot of disk space. If you are limited on storage space on your PC then you might want to reduce the file size of some of the larger images, especially if you have already tried doing a disk cleanup.
You may have also tried to send an image in an email and got an error because the file size of the image is too large. But luckily for us, there is a fast way of reducing the size of images within Windows 11 using Paint, which comes preinstalled with Windows 11. The only downside to the method below is if you have lots of images that you would like to reduce the image file size of, then it might take you a while to get through them all.
Will It Affect The Quality Of The Image?
Yes, unfortunately when you reduce the file size of an image you will then lose a bit of the quality. The best thing to do is make sure you have a backup of the image first then do the method below and ensure you are happy with how the image looks after reducing the file size.
Is It Free To Reduce Image File Size?
Yes, this is a free way to reduce an image file size in Windows 11 without having to download a third-party program.
There are third-party programs and websites that will be able to reduce an image file size in Windows 11 even more, as it will have better compression. But just keep in mind the more you reduce the image file size, the more it can impact the overall quality of the picture/image.
Related: How to speed up Windows
How To Reduce Image File Sizes In Windows 11:
Before you do the methods below we would advise that you ensure you make a copy of the image that you are about to reduce the file size of first, just in case you are not happy with the quality of the image after the size reduction.
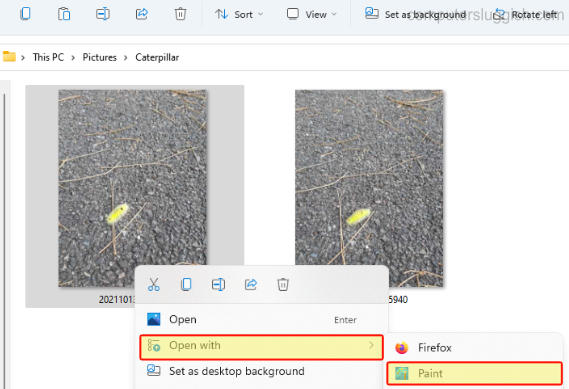
1. First find the image that you would like to change the file size of
2. Now right-click on the image select Open with then Paint
3. Once your image has been opened in Paint click File then Save

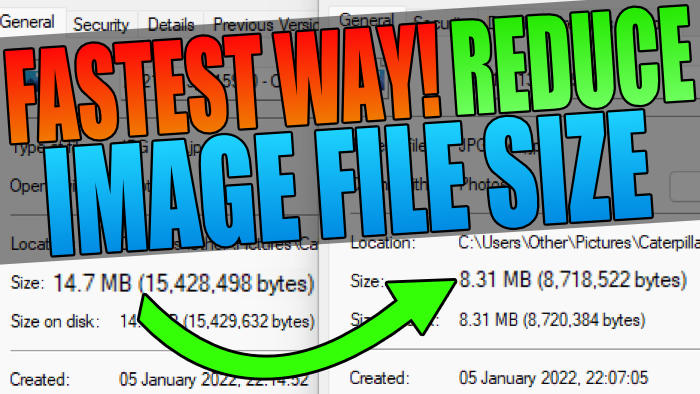
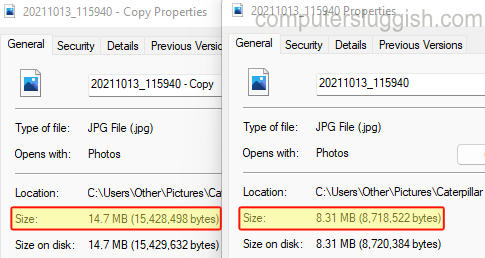
4. You can now check to see what size your image is by right-clicking on the image and going to Properties > As you can see below it has made a decent difference in the image file size.
There you go that’s how you can reduce the file size of images in Windows 11. It’s very straightforward and does a great job. Yes, you could reduce the size of an image even more using a program like GIMP, but that involves installing a program on your computer.
If you found this guide helpful then you should check out our other Windows 11 guides.