
In this guide, we will be taking a look at how to delete the Windows 11 DirectX shader cache from your computer.
Windows 11 has a DirectX shader cache that is used to help speed up applications and game load times, which of course helps improve the responsiveness of your games and apps. However, if you have been encountering graphical issues recently with one of your games or apps on your Windows 11 computer, then it could be the DirectX shader cache that’s causing the issue.
So clearing the DirectX shader cache in Windows 11 could help fix the problem and you never know it might even help speed up Windows 11. I have listed the steps below on how you can do this and don’t worry it’s not as tricky as it sounds.
Related: Clear NVIDIA cache files
Will Clearing DirectX Shader Cache Cause Problems?
No, clearing the shader cache in Windows 11 should not cause any issues as these files are temporary and will be recreated when you launch the game or application that uses them. In fact, it’s a great way to clear some old clutter and you can clear even more with a disk cleaner program.
So to summarize the DirectX shader cache is safe to delete on your Windows computer.
Why Clear DirectX Shader Cache In Windows 11?
As I said above, if you are having graphical issues with a game or program in Windows 11 then clearing the DirectX shader cache could help fix the program as one of the cache files might have become corrupted and could be causing the issue.
How To Clear DirectX Cache On Windows 11 PC:
Below are the steps for clearing the DirectX cache in Windows 11.
1. First, you need to open the Windows 11 Start menu and search Disk-Cleanup and open it

2. Select your C: Drive and press OK (If you have multiple drives then do the following steps for each drive)

3. Now deselect everything and then tick the DirectX Shader Cache within the list of Disk Clean-up

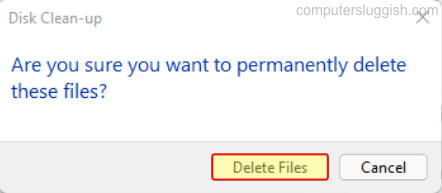
4. Now click OK > Then click on Delete Files
5. Your DirectX shader cache will now be cleared
There you have it you have now successfully cleared the DirectX Shader Cache on your Windows 11 PC. Go ahead and launch the program or game in which you were experiencing graphical and DirectX issues and see if it resolved the problem.
If it didn’t then you could always try updating DirectX in Windows 11.
You can also clear cache files for your graphics cards and game launchers using our program Easy Gamer Utility.
If you found this guide helpful then we are sure you would like our other Windows 11 guides.