If you have recently upgraded to Windows 11 or it’s your first time using the operating system, then you may be wondering how to add a local user profile as by default Windows 11 usually gets you to create and sign in with a Microsoft account.
Luckily it’s fairly straightforward to add a local user to Windows 11. In fact, it’s basically the same process as Windows 10, you just need to ensure you are currently signed in as an administrator to be able to create a new user.
Table Of Contents
Why Add A Local User Account?
If you have several people using the same Windows 11 PC or laptop then creating separate users is a great way for keeping everyone’s documents, apps, and personalisations separate.
It will give each user their own privacy and also security as each user will be able to store their passwords to their own account, so no one else on the computer will be able to view the passwords!
Can You Change A Local Users Persmissions?
The answer is very simple and yes you can change the permissions of a local user in Windows 11. When you create a new local user account by default it will be a standard user, which means they will not be able to do certain things within Windows 11. Things such as changing system settings, installing new software, and accessing restricted files without the password of an administrator.
If you would like the local account to have full control of the computer then you can always change the account type to an administrator.
Can You Delete A Local User If You Change Your Mind?
Yes, you can delete a local user account within Windows 11 if you change your mind and you no longer want it on your computer. And don’t worry you do not need to jump through a load of hoops to be able to do this as it’s fairly straightforward.
How To Create A Local User Profile In Windows 11
Below we have listed the steps for adding a new local user account to Windows 11. As we mentioned above you will need to be signed in as an administrator to be able to do the below.
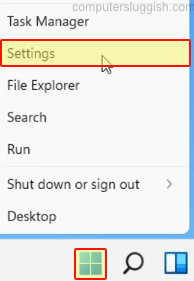
1. Right-click on the Windows Start Menu > Click on Settings

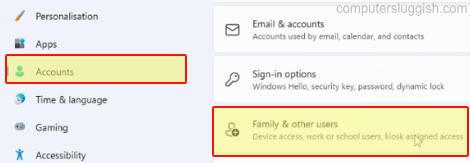
2. Click on Accounts in the left-hand menu > Click on Family and other users (underneath “Other users“)

3. Click on “Add account“

4. Select “I Don’t have this person sign-in information“

5. Click on “Add a user without a Microsoft account“

6. Create a username and password of your choice
7. Fill in the security questions and answers and press Next

8. You will now have a new local account added to your Windows 11 PC or laptop. If you now sign out of Windows 11 you will then see the new user on the sign-in screen
If for some reason the user is not showing then restart your computer and this should resolve the issue and you will be able to choose which user profile you would like to sign into once your computer has restarted.
So as we mentioned above, using multiple local user accounts on your Windows 11 computer has lots of benefits. We have loads of different user profiles on our computer and no one else uses them but ourselves, it just helps to keep everything separated. For example, a user profile for work, another for browsing the web, then one for just gaming.
Did you know you can also add a Microsoft account user which will be signed in to their Microsoft account and sync up with settings and files from your other devices? So this can save a lot of time when it comes to setting up Windows 11 to how you like it.
Also, if you did enjoy this guide then check out our other Windows 11 guides here.


