Fortnite OG Season is now available for everyone to download and install to their computer, Xbox, PlayStation, Switch, and even mobile phone (if you have one that’s powerful enough to handle the game).
So in this guide, we will be taking a look at how you can install Chapter 3 Fortnite to your Windows computer.
If you already have Fortnite installed on your computer then it will automatically update to the latest seasson, which will be the same with any device.
But if you have never installed Fortnite before then we have listed steps below on how you can set it up, and you will be playing the fantastic free-to-play shooter in no time.
Table Of Contents
What Is Fortnite?
Fortnite is a free-to-play Battle Royale shooter game, which we personally have spent a good amount of time playing over the previous chapters.
But unlike other Battle Royale games like Warzone, you get to complete in-game challenges which are very fun and keep you engaged.
In fact, sometimes we don’t even end up trying to win a Victory Royale and survive the storm phases, as we are too hooked on completing the challenges and earning XP to level up, unlock skins and earn gold.
Is Fortnite Just A Battle Royale?
No, the Fortnite game comes with a lot more to do than just a Battle Royale mode:
You can play lots of different game modes that other players have created
You can enter Creative mode and design your own map and basically do whatever you want
You can purchase Save The World and see if you can survive against the waves of monsters, which again is a brillant game mode within Fortnite Chapter 3
Is Fortnite Free?
Fortnite Chapter 3 Battle Royale is free to download and play. The only thing that you need to pay for is the Battle Pass, but it’s not required to play the game.
The Battle Pass just allows you to unlock even more skins, characters, emotes, and more. Also, within the store you will need to pay if you want new cosmetics and characters, using your V Bucks.
And unfortunately, Fortnite Save the World is not free but who knows maybe one day it might become free, we can only wait and see.
TIP: If you do decide to purchase the Battle Pass (currently 950 V Bucks) if you complete the pass you will receive slightly more V Bucks than you used to actually purchase the Battle Pass. So over time, if you keep completing the pass in each season you will have a lot of V Bucks which you can spend within the Fortnite store or even purchase the next season’s Battle Pass!
How to Install Fortnite PC In Windows:
Now you know what Fortnite is all about and you know it’s free to play, why not give it a try. You will need the Epic Games Launcher to install the game on your PC and an Epic Games account, which you can sign up for here.
1. If you already have the Epic Games Launcher then skip to step 2. If you do not have it installed on your PC then you can download it from here > Click on Save file
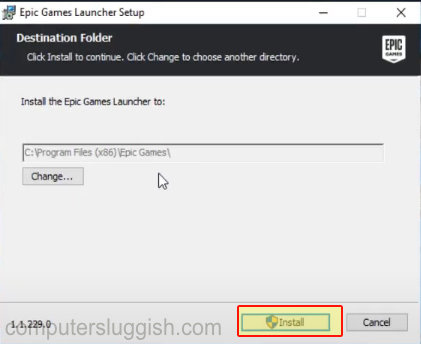
2. Once the file has been downloaded run the setup file > Follow the on-screen instructions

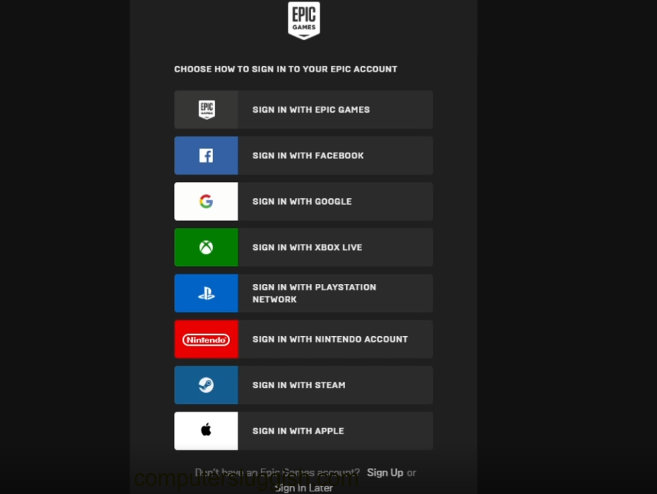
3. Launch the Epic Games Launcher > Sign in to your account or Register if you still haven’t created an account yet

5. Click onto “Store” in the left-hand side menu > In the search box at the top type “Fortnite” and press enter

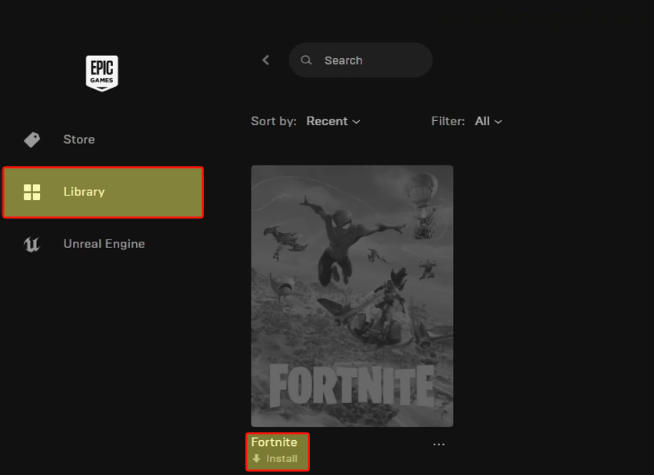
6. Click on “Get” on the right-hand side and Fortnite will be added to your Library > Next click onto “Library” from the left menu
7. Find Fortnite in your library and click on “Install” > You now need to choose where you would like to install Fornite then click Install > You will now be able to go back to your Library and click on Launch

So that’s how you install Fortnite on your Windows computer and you can now jump into the Fortnite game and start leveling up. If you decide to purchase the Battle Pass you can start collecting those cool new characters.
If you are having issues with the Epic Games Launcher crashing or freezing then there are a few methods to fix it and you can also clear the Epic Games Launcher cache to fix issues.
You can also play with your friends from other devices and complete the challenges together, just ensure you have enabled crossplay within the settings.
If you enjoyed this guide and found it helpful then you should check out our other gaming guides.


