

Adding a certificate in Firefox is straightforward and very similar to how you import certificates in Edge and Chrome. It is done within your Mozilla Firefox browser settings where you can view, manage and import SSL certificates of your choice.
You can import a variety of file types such as .cert and .cer using your Firefox browser, but just be careful and make sure that you know and trust the certificate that you are going to add to your browser.
Do I need to add my certificate to Firefox?
Basically, by importing a certificate you are essentially letting your Firefox browser know that the site is secure and safe, with an SSL. You may also fix some of the following common error messages:
- “Your connection is not secure”
- “Your connection is not private”
- “Can’t connect securely to this page”
- “There is a problem connecting to this website”
We all want to avoid having error messages, and did you know you can also add a trusted website to Firefox? By doing this you can stop a website from being partially or fully blocked, but as we mentioned above please make sure you trust a site before adding it to the exceptions list.
Importing A SSL Certificate in Firefox:
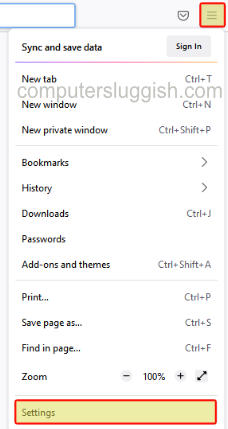
1. Open up Firefox and click on the 3 lines in the top right-hand corner > Go to Settings
2. Click on Privacy & Security in the left-hand menu > Scroll down to Security and under Certificates click on “View certificates“

3. Select the “Your certificates” tab > Click on Import…

4. Browse for your file and follow the steps
How To Check Your Certificate is added in Firefox:
1. Go to the same area as above (Settings > Privacy & security > View Certificates)
2. Click on “Your certificates” and you should be able to see yours there
3. You can also view other certificates by group by clicking on the different tabs like Authorities and People etc.

That’s how you can add or import a certificate in Firefox on your PC or laptop. If you did want to remove it at a later date then this is easily done within the same settings. We hope this guide helped you out, if it did then check out our other Windows guides here.