
Are you are getting a black border/line around your display on your monitor in Windows 10? If you are then don’t worry because if your monitor can fill that empty black space on your display then there are a few things that you can do within Windows 10 that will hopefully fix the black border on your display, and that’s exactly what we will be taking a look at in this guide. Below we have listed different methods that you can do on your Windows 10 PC or laptop.
What If The Methods Do Not Work?
If the methods below don’t help fix the black border around your display then if you have an NVIDIA graphics card you could check out this guide. Or if you have another monitor available try using that and see if you have the same black border issue, so you can determine if it’s an issue with Windows or the monitor.
If it is Windows related then you could try resetting Windows 10, and if it’s not Windows then it could be your Graphics card. If you think it is your monitor causing the issue then you could try contacting the manufacturer of your monitor.
Will I Need A New Monitor?
It depends if it is an issue with your monitor or if it’s a problem with Windows. But as we said above, it could even be your graphics card so without trying the methods below only you can then decide if you can carry on using Windows with the black borders and figure out what is the cause.
How To Fix Black Border & Lines Around Monitor:
Below are the methods for getting rid of the black border around your monitor display in Windows 10.
Fix 1: Change source
First, change the source on your monitor and ensure that your monitor does display something within the black border area that you are getting in Windows 10, as it might actually be black and a part of the monitor.
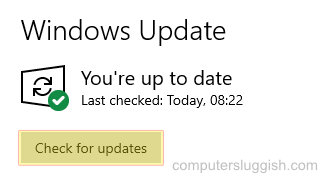
Fix 2: Update Windows 10
- Right-click the start menu icon and select Settings
- Now click Update & Security > Click Check for updates button and let Window see if any new updates are available and then install them
Fix 3: Update GPU Driver
Not having the latest or correct driver installed for your GPU could cause issues.
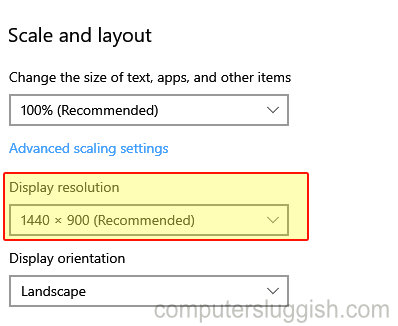
Fix 4: Change Display Resolution
- Right-click desktop and select Display settings
- Now change Display resolution (work your way down from the highest resolution until you come across one that fits your monitor and removes the black borders)
Fix 5: Change scale
- Right-click desktop and select Display settings
- Click on the dropdown next to “Change the size of text, apps and other items” and change the Scale until you find one that suits your monitor and removes the black border around the screen
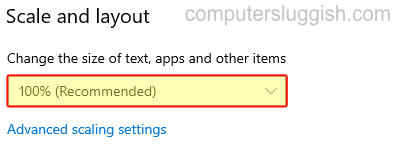
- Also within the Display settings click “Advanced scaling settings“
- Type a custom scale number until one fits your display (If you toggle “Let Windows try to fix apps so they`re not blurry” to On this can help with blurriness within apps)

Fix 6: Monitor
Reset Monitor to factory settings, if you are not sure how to do this then you will need to check the manual for your monitor.
Fix 7: Display port
Change the display cable and try different display ports if possible.
We hope the above methods helped resolve the black borders that you are getting around your display in Windows 10, and you now have a full view of your display on your Windows 10 PC. As let’s face it, the black borders around the screen can be a little annoying and off-putting! If you found this guide helpful then we are sure you would like our other Windows 10 guides!