
The default font that Windows 10 uses is called Segoe UI, and it is not to everyone’s taste. But there is a way to change the default font on your Windows 10 PC or laptop. This is great news if you are like us, and you like to customize your Windows computer.
If you have already hunted around within the Windows 10 settings to then notice that there is not an option to change the default font then that’s correct, as the only way to be able to change Windows 10 default font is from the registry.
Luckily it’s not too difficult to do as you can create a file that will make all the changes that need to be done. But when it comes to making changes to the registry things can sometimes go wrong so we would recommend you make a backup of your registry before doing this.
Table Of Contents
Can you change Windows font to any font?
When it comes to changing the default font that Windows 10 uses, you can change it to whatever font you want. This is providing you have the font installed on your computer.
Just keep in mind that the font you choose will need to be easy enough to read. This is because changing the font that Windows 10 uses will change all fonts within the operating system to the one you have chosen!
Is it safe to change Windows 10 system fonts?
Yes, it is safe to change the standard font that your Windows 10 system uses. However, just like anything else when playing around with the registry, there are risks. So make sure you are confident before making changes to your Windows 10 registry.
As we mentioned above, we would advise you to make sure you backup your Windows 10 registry before making any changes to it. And also back up any important files you have on your computer.
How to change Windows 10 default font:
1. Open Notepad
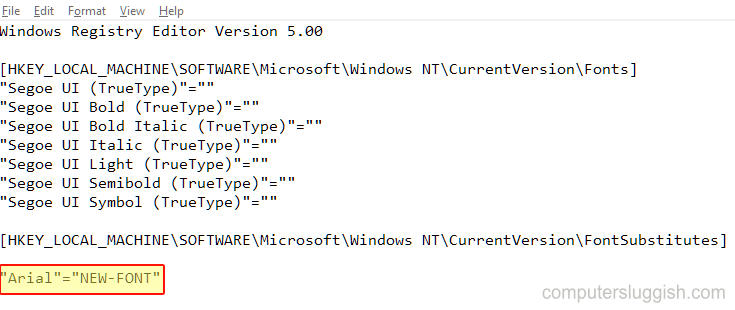
2. Copy and paste the following code into Notepad:
Windows Registry Editor Version 5.00

[HKEY_LOCAL_MACHINE\SOFTWARE\Microsoft\Windows NT\CurrentVersion\Fonts]
"Segoe UI (TrueType)"=""
"Segoe UI Bold (TrueType)"=""
"Segoe UI Bold Italic (TrueType)"=""
"Segoe UI Italic (TrueType)"=""
"Segoe UI Light (TrueType)"=""
"Segoe UI Semibold (TrueType)"=""
"Segoe UI Symbol (TrueType)"=""

[HKEY_LOCAL_MACHINE\SOFTWARE\Microsoft\Windows NT\CurrentVersion\FontSubstitutes]

"Segoe UI"="NEW-FONT"
3. Go to the Windows 10 start menu and type in Control Panel and open it
4. Change the “View by” to Small > Click on Fonts
5. Choose which font you want to change your Windows 10 font to (for example Arial)
6. Go back to Notepad and at the bottom where it says NEW-FONT replace Segoe UI with the name of the font you would like to change to such as Arial or Calibri (make sure you have spelled it exactly the same as in the Control Panel Fonts folder)
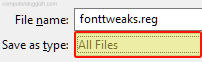
7. Click on File > Save as > Save it to your Desktop and rename it to something like fonttweaks.reg > Change Save as type to “All files” > Press Save
8. Close Notepad and Control Panel down
9. Double click on your font tweak folder > Press Yes > OK
10. Restart your PC > Once your PC has restarted you will notice that your fonts have changed to your chosen font
So there you go you have now changed the default font that Windows 10 uses and you can change the font as many times as you want by repeating the steps we listed above. So if you are bored of the standard default Windows fonts then this is a great way of customizing your system.
If you found this post helpful then check out our other helpful Windows 10 posts here.